Left Toolbar > ![]() Stretch Nodes >
Stretch Nodes > ![]() Resize
Resize
The Stretch node breaks the input image in 9 sections, 3 in X and 3 in Y, and resize these sections at different rates. This node was designed to resize images like frames, where the corners should always have the same aspect ratio.
input
 Img
Img
 Img
Img
output

On the left toolbar choose Layout Nodes > Stretch. ![]() >
> ![]()
Drag the Stretch icon into the Node Graph.

Connect the output of an image node into the Img input in the Stretch node.
Adjust the attributes of the Stretch node to modify the output image.
The Stretch node is an Input Output Pair node.
Img
The Image to be stretched.
Img
The stretched image.
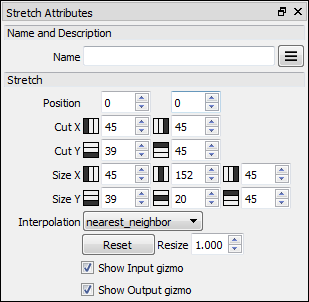
Cut X
The vertical cuts on the input image.
Cut Y
The horizontal cuts on the input image.
Size X
The size of the vertical sections of the output image.
Size Y
The size of the horizontal sections of the output image.
Interpolation Interpolation method for the resize algorithm.
Reset Sets all values to their original sizes.
Reset Resize This value applies a global resize when the Reset button is pressed.
Show Input gizmo Shows and hides the input gizmo.
Shows Output gizmo Shows and hides the output gizmo.
Allows the user to modify the output image in an interactive way in the Image viewport:
Input Gizmo - Yellow

The input gizmo shows the lines that cut the input image, and allows you to edit the cuts value in the input image. Holding down the shift key while draggin the cut line, both the cut values on the input image and the size values on the output image are modified at the same time.
Ouptut Gizmo - Green
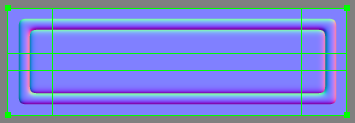
The output gizmo allows the user to set the size and position of the