Pixaflux
Sprite It Tutorial Dots
This tutorial will build a Sprite It program from scratch, adding attributes, nodes and functions that will generate a parametric texture.
In PixaFlux
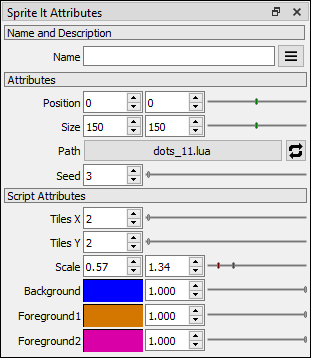
Start a new Project and add a Sprite It node: (Layout Nodes > Sprite It).
Load the Lua file using the Path button.
Double-click the node to refresh its user interface by setting it as the active and display node.
PixaFlux loads the Lua script to memory and doesn't reload them until the reload button is pressed. After any change to the code, press the reload button. This will disable the node user interface. To enable it again, double-click the node to reactivate it.
Lua code
The Sprite It program that will generate the sprites is coded in Lua, a lightweight programming language that is executed by the Sprite It node in PixaFlux.
Create the Lua file
Create a new text file and save it as dots.lua.
Add a Lua comment stating the name of this file. This will help us identify the script that has failed when Lua reports an error.
-- tutorials/dots.lua
Required Modules.
-- tutorials/dots.lua

-- Load Required Modules

vector2 = require("vector2")
matrix2 = require("matrix2")
box2 = require("box2")
rgbo = require("rgbo")
spriteIt = require("SpriteIt")
The SpriteIt module includes all the Lua code required to generate the sprites that will be rendered by PixaFlux. The vector2, matrix2, box2 and rgbo modules are required to add and use this structures in the project.
Define the Sprite Context
-- Define Sprite Context
spriteContext = spriteIt.newContext()
spriteContext.blend = "over"
spriteContext.images = {"output"}
spriteContext.channels = {output = {1, 2, 3, 4}}
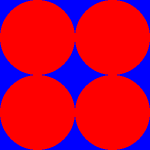
spriteContext.values = {0.0, 0.0, 1.0, 1.0}
The Sprite Context is the structure that generates the sprites. This code defines the type of blending that will be used when composing the sprites ("over"), the name and number of images that will be generated (1: "output"), the type and channels of the image (4 channels), and the values of the channels (blue: 0.0, 0.0, 1.0, 1.0).
Evaluate the Sprite Context
-- Evaluate Sprite Context

spriteContext:evaluate()
This is all that is needed to define a context that generates a blue image:

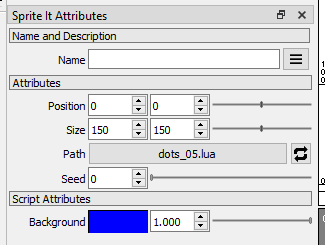
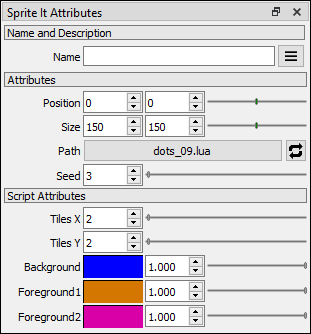
Attributes
The SpriteIt module allows us to add attributes to the program. This attibutes will be added to the node user interface in PixaFlux, and any changes in the attributes will be evaluated and used to generatea new image.
Add the background color attributes
spriteIt = require("SpriteIt")

-- Define Attributes

spriteIt.rgboAttribute("background", 0.0, 0.0, 1.0, 1.0)

-- Resolve Attributes

spriteIt.resolveAttributeValues()

background = spriteIt.getAttributeValue("background")
The spriteIt.rgboAttribute function adds a new attribute to the program. The 4 numbers are the red, green, blue and opacity channel default values.
The spriteIt.resolveAttributeValues() function grabs the values from PixaFlux and applies them to the attribute structures.
The spriteIt.getAttributeValue returns the value in the attribute structure and sets it to a local variable.
And with the background color stored in the local background variable, we can now set the channel values:
-- Define Sprite Context

spriteContext = spriteIt.newContext()
spriteContext.blend = "over"
spriteContext.images = {"output"}
spriteContext.channels = {output = {1, 2, 3, 4}}
spriteContext.values = {background.r, background.g, background.b, background.o}
Add Tiles Node
The Tiles node divides the area in a rectangular array of tiles.
Add the attributes that set the tiles in x and y values and the tiles node:
-- Define Attributes

spriteIt.numberAttribute("tiles_x", 2.0, 1.0, 64.0, 1.0, 0)
spriteIt.numberAttribute("tiles_y", 2.0, 1.0, 64.0, 1.0, 0)
spriteIt.rgboAttribute("background", 0.0, 0.0, 1.0, 1.0)

-- Resolve Attributes

spriteIt.resolveAttributeValues()

tilesX = spriteIt.getAttributeValue("tiles_x")
tilesY = spriteIt.getAttributeValue("tiles_y")
background = spriteIt.getAttributeValue("background")
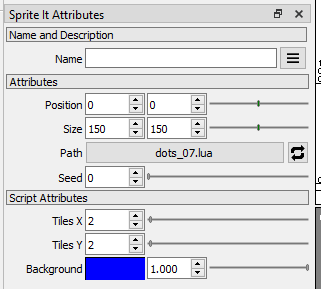
The spriteIt.numberAttribute function adds a new number attribute to the program. The numbers are the default value, the maximum and minimum values, the step value and the number of decimals of the attribute.
-- Create the nodes

tiles = spriteIt.newTilesNode("tiles")
tiles.tilesX = tilesX
tiles.tilesY = tilesY
Add the tiles node to the Sprite Context.
-- Connect Nodes

spriteContext:setNode(tiles)
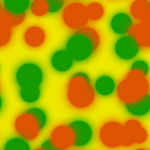
Add Spawn Node
The Spawn node generates a new sprite and adds it to the sprite context when it's evaluated.
spawnNode = spriteIt.newSpawnNode("spawnNode")
spawnNode.shape = "bump"
spawnNode.values = {1.0, 0.0, 0.0, 1.0}

-- Connect Nodes

spriteContext:setNode(tiles)
tiles:setNode(spawnNode)
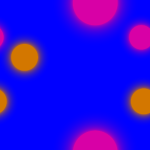
The shape key is set to bump to generatea a sprite with a circular shape, and values is set to {1.0, 0.0, 0.0, 1.0} to set the color to red.
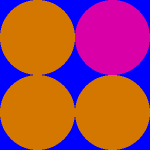
Add the foreground colors
For the foreground colors we'll use two rgbo attributes and a Lua function to select which color to use with a random value.
-- Define Attributes

spriteIt.numberAttribute("tiles_x", 2.0, 1.0, 64.0, 1.0, 0)
spriteIt.numberAttribute("tiles_y", 2.0, 1.0, 64.0, 1.0, 0)
spriteIt.rgboAttribute("background", 0.0, 0.0, 1.0, 1.0)
spriteIt.rgboAttribute("foreground1", 1.0, 0.0, 0.0, 1.0)
spriteIt.rgboAttribute("foreground2", 1.0, 1.0, 0.0, 1.0)

-- Resolve Attributes

spriteIt.resolveAttributeValues()

tilesX = spriteIt.getAttributeValue("tiles_x")
tilesY = spriteIt.getAttributeValue("tiles_y")
background = spriteIt.getAttributeValue("background")
foreground1 = spriteIt.getAttributeValue("foreground1")
foreground2 = spriteIt.getAttributeValue("foreground2")

foreground = {foreground1, foreground2}

-- Get Seed Attribute

seed = spriteIt.getSeed()
math.randomseed(seed)
The foreground variable holds the two foreground colors in a list with two elements.
The spriteIt.getSeed() function returns the seed attribute value. We use this value to seed the Lua random functions.
-- Define Node Functions

function SpriteValues(spriteContext, state)
    local f = foreground[math.random(1, 2)]
    return {f.r, f.g, f.b, f.o}
end
The keys of the Sprite It nodes can be either values or functions. Sprite It checks if the value or function return a variable with the right type (number, vector2, rgbo, etc). When a function is added as a key, it gets called when the node is evaluated, and it can use the spriteContext and state tables to decide what values to return.
In this case the SpriteValues function gets a random color from the foreground list.
Set the SpriteValues function as the spawnNode.values value.
spawnNode = spriteIt.newSpawnNode("spawnNode")
spawnNode.shape = "bump"
spawnNode.values = SpriteValues
Soften the sprite shape
The Spawn node has an index and parameters key that can be used to fine tune the shape of the sprite.
spawnNode = spriteIt.newSpawnNode("spawnNode")
spawnNode.shape = "bump"
spawnNode.index = 4
spawnNode.parameters = {0.5, 0.0, 0.0, 0.0}
spawnNode.values = SpriteValues
The index sets the transition of the border or the shape. A value of 1 sets the transition to linear. The parameters key is a 4-elements list that sets the transition, and the slant x and y values. See Sprite It Sprites for more information about the sprite shapes and options.
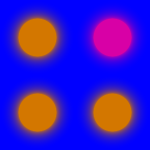
Add a random scaling
To scale the sprites we'll use a point attribute and a function that will select a random value between scale.x and scale.y.
Add the scale attributes.
spriteIt.numberAttribute("tiles_x", 2.0, 1.0, 64.0, 1.0, 0)
spriteIt.numberAttribute("tiles_y", 2.0, 1.0, 64.0, 1.0, 0)
spriteIt.pointAttribute("scale", 0.0, 1.0, 0.0, 5.0, 0.1, 2)
The spriteIt.pointAttribute function adds a new point (vector2) attribute to the program. The numbers are the default x and y values, the maximum and minimum values, the step value and the number of decimals of the attribute.
tilesX = spriteIt.getAttributeValue("tiles_x")
tilesY = spriteIt.getAttributeValue("tiles_y")
scale = spriteIt.getAttributeValue("scale")
Add the function that returns the scale of the sprite.
function SpriteScale(spriteContext, state)
    local s = scale.x + math.random() * (scale.y - scale.x)
    return vector2(s, s)
end
And set the scale key to SpriteScale.
spawnNode = spriteIt.newSpawnNode("spawnNode")
spawnNode.shape = "bump"
spawnNode.index = 4
spawnNode.parameters = {0.5, 0.0, 0.0, 0.0}
spawnNode.values = SpriteValues
spawnNode.scale = SpriteScale

Add random spread
We'll use a function in the sprite offset to spread the sprites across the sprite area.
Add a spread attribute:
spriteIt.pointAttribute("scale", 0.0, 1.0, 0.0, 5.0, 0.1, 2)
spriteIt.numberAttribute("spread", 1.0, 0.0, 5.0, 0.1, 2)
scale = spriteIt.getAttributeValue("scale")
spread = spriteIt.getAttributeValue("spread")

Add a SpriteOffset function:
function SpriteOffset(spriteContext, state)
    local v = spriteIt.Disorder(spread)
    return v
end
The spriteIt.Disorder function returns a random vector2 placed on a circular area. The spread value the radius of the circle.
spawnNode.values = SpriteValues
spawnNode.offset = SpriteOffset
spawnNode.scale = SpriteScale
When an attribute is modified in PixaFlux the graph is reevaluated.
Things to try
- Add more foreground colors.
- Return a non-uniform scale by adding a second random scale value.
- Change the shape, index and paramenter values of the Spawn node.
- Add a
SpriteIt.RandomRotationfunction to the spanwn noderotationkey.